

7-Antialiasing
How Low-Pass Filters Help Prevent Aliasing in Audio and Images
Meta Title
How to Prevent Aliasing in Audio and Images Using Low-Pass Filters
Meta Description
Learn what aliasing is, why it happens in digital audio and images, and how low-pass filters help prevent it. Includes simple real-world examples and beginner-friendly Python code.
What Is Aliasing?
Aliasing happens when a digital system doesn’t capture enough information from a signal.
You’ll usually notice it as:
- weird checkerboard patterns in images
- jagged edges in graphics
- distorted sounds in audio recordings
In simple terms, the signal changes too fast, but the system samples too slowly.
This is a common issue in:
- digital signal processing
- image processing
- computer graphics
- audio engineering
- machine learning data pipelines
And yes — adding more samples can help. That’s why cameras now come with huge megapixel counts. More pixels mean more detail.
But there’s a limit to that approach.
Some details can still change faster than your system can capture accurately.
So instead of trying to capture everything, engineers often remove some of the highest-frequency information before sampling.
That’s where low-pass filters come in.
The Main Idea Behind Preventing Aliasing
The goal is simple:
Make the signal less “wiggly” before sampling it.
In signal processing terms, that means reducing high-frequency components.
Instead of allowing extremely sharp changes in sound or image detail, we smooth things slightly so the sampled version behaves more predictably.
This tradeoff is usually better than visible or audible aliasing artifacts.
A Real-Life Example
Think about recording a spinning bicycle wheel on your phone.
Sometimes the wheel appears to:
- spin backward
- freeze
- wobble strangely
But the wheel isn’t actually doing that.
The camera just isn’t capturing frames fast enough relative to the wheel’s motion.
That visual distortion is aliasing.
Now imagine slightly blurring the wheel before recording it. You lose a tiny amount of sharp detail, but the strange motion artifacts become less noticeable.
That blur acts similarly to a low-pass filter.
What Is a Low-Pass Filter?
A low-pass filter allows low-frequency signals to pass through while reducing high-frequency signals.
In audio systems, engineers place the filter before analog-to-digital conversion.
The process usually looks like this:
- Microphone captures analog sound
- Low-pass filter removes extremely high frequencies
- Analog-to-digital converter samples the signal
- Digital system processes the sound
- Another low-pass filter smooths playback before sending audio to speakers
This helps prevent frequencies from being misinterpreted during sampling.
Why Sampling Rate Matters
According to the Nyquist sampling principle, your sampling rate must be at least twice the highest frequency in the signal.
When that condition is violated, aliasing appears.
The relationship is usually written as:
fs≥2fmax
Where:
- fs = sampling frequency
- fmax = highest frequency in the signal
If high frequencies exceed this limit, they fold back into lower frequencies and create distortion.
Aliasing in Images vs Audio
In Images
Aliasing appears as:
- moiré patterns
- jagged edges
- flickering textures
- checkerboard artifacts
High-resolution cameras reduce this problem, but image filters are still often used.
In Audio
Aliasing sounds like:
- harsh distortion
- unnatural tones
- metallic artifacts
That’s why audio systems use anti-aliasing filters before digitizing sound.
Python Example: Demonstrating Aliasing
Here’s a beginner-friendly Python example using NumPy and Matplotlib.
We’ll create:
- A high-frequency signal
- A properly sampled version
- An undersampled version that produces aliasing
Python Code
import numpy as np
import matplotlib.pyplot as plt

# Create a time axis for the original signal
t = np.linspace(0, 1, 1000)

# Original high-frequency signal (20 Hz sine wave)
original_signal = np.sin(2 * np.pi * 20 * t)

# Proper sampling rate
sample_rate_good = 100
t_good = np.linspace(0, 1, sample_rate_good)
samples_good = np.sin(2 * np.pi * 20 * t_good)

# Poor sampling rate (causes aliasing)
sample_rate_bad = 25
t_bad = np.linspace(0, 1, sample_rate_bad)
samples_bad = np.sin(2 * np.pi * 20 * t_bad)

# Plot everything
plt.figure(figsize=(10, 6))

# Original signal
plt.plot(t, original_signal, label='Original Signal')

# Properly sampled points
plt.scatter(t_good, samples_good, label='Good Sampling')

# Aliased samples
plt.scatter(t_bad, samples_bad, label='Aliased Sampling')

plt.title("Aliasing Example")
plt.xlabel("Time")
plt.ylabel("Amplitude")
plt.legend()

plt.show()
What This Example Shows
The original signal changes quickly.
With enough samples:
- the waveform looks accurate
- reconstruction is possible
With too few samples:
- the signal appears incorrect
- the waveform may look slower or distorted
That incorrect interpretation is aliasing.
Why Engineers Prefer Filtering Over Infinite Sampling
You could keep increasing the sampling rate forever.
But that creates problems:
- larger file sizes
- more memory usage
- higher processing costs
- slower systems
So instead, engineers often:
- limit high frequencies
- smooth signals
- sample at practical rates
That balance is more efficient.
Best Practices for Reducing Aliasing
Use Higher Sampling Rates
More samples usually improve accuracy.
Apply Low-Pass Filters
Remove frequencies your system can’t safely capture.
Match Sampling Rate to Signal Complexity
Fast-changing signals require faster sampling.
Use Anti-Aliasing in Graphics
Modern rendering systems smooth edges before display.
Suggested Internal Links
You could internally link this article to related topics like:
- “Introduction to Digital Signal Processing”
- “What Is the Nyquist Theorem?”
- “How Image Sampling Works”
- “Understanding Fourier Transforms”
- “Beginner Guide to Audio Processing in Python”
Suggested Image Alt Text
If you include diagrams or screenshots, use descriptive alt text like:
- “Diagram showing aliasing caused by low sampling rate”
- “Example of checkerboard aliasing in digital images”
- “Low-pass filter reducing high-frequency audio signals”
- “Python graph comparing proper sampling and aliasing”
Final Thoughts
Aliasing happens because digital systems can’t perfectly capture rapidly changing signals.
One solution is taking more samples.
But in practice, filtering out unnecessary high-frequency detail is often more effective and efficient.
That’s why low-pass filters are a core part of:
- audio systems
- digital cameras
- rendering engines
- signal processing pipelines
They help digital systems behave more predictably — even if that means sacrificing a little detail.
Try It Yourself
Run the Python example and experiment with different sampling rates.
Try changing:
- the signal frequency
- the number of samples
- the waveform type
You’ll quickly see how aliasing appears.
And if you’re learning signal processing or machine learning, consider keeping your experiments in a GitHub repository so you can track improvements over time.
How Computers Get Confused by Sound and Images (Aliasing Explained Simply)
Meta Title
Aliasing Explained for Beginners: Why Computers Misread Sound and Images
Meta Description
Learn what aliasing is in simple terms. See how computers sample sound and images, why distortion happens, and how low-pass filters help fix it.
Imagine Taking Photos of a Fast Fan
Have you ever recorded a spinning fan with your phone and noticed something weird?
Sometimes the fan:
- looks like it’s spinning backward
- appears slower than it really is
- or even seems frozen
But the fan isn’t actually doing that.
Your camera is just getting confused.
This is called aliasing.
And it happens because the camera isn’t taking enough pictures every second to correctly understand the motion.
The same thing happens in:
- audio recording
- video games
- digital cameras
- computer graphics
- music production
What Does “Sampling” Mean?
Computers don’t see the world continuously like humans do.
Instead, they take tiny measurements again and again.
This is called sampling.
For example:
- a camera samples light
- a microphone samples sound
- a game engine samples movement
The more samples you take, the more accurate things look and sound.
Why Aliasing Happens
Aliasing happens when something changes too quickly, but the computer samples too slowly.
Think about this:
Imagine your teacher only checks your homework once a month.
They might completely miss:
- bad grades
- improvements
- missing assignments
Not enough checking = incomplete information.
Computers have the same problem.
If they don’t collect enough samples, they start guessing incorrectly.
That creates:
- blurry patterns
- jagged lines
- weird sounds
- fake movement
Real-Life Example: Checkerboard Patterns
Sometimes in videos, tiny striped shirts or building patterns look strange or shaky.
You may notice:
- flickering
- rainbow patterns
- checkerboard effects
That’s another form of aliasing.
The camera sensor can’t properly capture those super tiny details.
So How Do We Fix It?
There are two common solutions.
1. Take More Samples
This is why modern cameras have lots of megapixels.
More pixels = more detail.
Phones today can capture millions of tiny points in one image.
But there’s a limit.
You can’t keep increasing forever because:
- files become huge
- devices get slower
- processing becomes expensive
So engineers use another trick.
2. Remove Extra Detail Before Sampling
This sounds strange at first.
Why remove detail?
Because bad detail is often worse than slightly less detail.
Instead of letting the computer get confused, we smooth things out first.
This is done using something called a low-pass filter.
What Is a Low-Pass Filter?
A low-pass filter removes very fast changes from a signal.
In simple words:
- it smooths things a little
- removes extreme detail
- makes signals easier to understand
Think of it like slightly blurring an image before shrinking it.
You lose a tiny bit of sharpness,
but the weird patterns disappear.
That’s usually a better result.
Audio Example
Imagine recording a very high-pitched sound.
If your microphone samples too slowly:
- the sound may become distorted
- strange fake tones can appear
So audio systems use low-pass filters before converting sound into digital data.
The process looks like this:
- Microphone captures sound
- Low-pass filter removes extreme frequencies
- Computer samples the sound
- Audio plays back more cleanly
The Main Rule Computers Follow
There’s an important idea in signal processing:
To correctly capture a signal, the computer must sample at least twice as fast as the highest frequency.
It looks like this:
fs≥2fmax
You don’t need to memorize it.
Just remember:
Fast-changing signals need fast sampling.
Simple Python Example
Here’s a beginner-friendly example showing aliasing using Python.
This code creates:
- one properly sampled signal
- one badly sampled signal
Python Code
import numpy as np
import matplotlib.pyplot as plt

# Create smooth time values
t = np.linspace(0, 1, 1000)

# Original fast wave
signal = np.sin(2 * np.pi * 20 * t)

# Good sampling
t_good = np.linspace(0, 1, 100)
good_samples = np.sin(2 * np.pi * 20 * t_good)

# Bad sampling (too few points)
t_bad = np.linspace(0, 1, 15)
bad_samples = np.sin(2 * np.pi * 20 * t_bad)

# Plot the original signal
plt.plot(t, signal, label="Original Signal")

# Plot sampled points
plt.scatter(t_good, good_samples, label="Good Sampling")
plt.scatter(t_bad, bad_samples, label="Bad Sampling")

plt.title("Aliasing Example")
plt.xlabel("Time")
plt.ylabel("Amplitude")
plt.legend()

plt.show()
What You’ll Notice
The “good sampling” points follow the wave nicely.
But the “bad sampling” points make the wave look wrong.
That wrong version is aliasing.
The computer didn’t get enough information.
Where Aliasing Appears in Real Life
You can find aliasing in:
- video games
- YouTube videos
- digital music
- VR headsets
- cameras
- AI image processing
- movie effects
Even anti-aliasing settings in games are designed to reduce jagged edges caused by aliasing.
Suggested Internal Links
You could connect this topic to:
- “What Is Digital Signal Processing?”
- “How Cameras Capture Images”
- “Beginner Guide to Audio Sampling”
- “What Is the Nyquist Theorem?”
- “Python for Signal Processing Beginners”
Suggested Image Alt Text
- “Example of aliasing in a spinning fan video”
- “Jagged edges caused by low image sampling”
- “Graph showing proper sampling vs aliasing”
- “Low-pass filter smoothing a signal”
Final Thoughts
Aliasing happens when computers don’t collect enough information fast enough.
Instead of trying to capture every tiny detail, engineers often:
- smooth the signal
- remove extreme frequencies
- sample more carefully
That helps sound and images look more natural.
And once you notice aliasing, you’ll probably start seeing it everywhere.
Try It Yourself
Run the Python example and experiment with:
- different wave speeds
- more or fewer samples
- different graph shapes
You’ll learn a lot just by changing a few numbers.
And if you’re learning programming or AI, save your experiments in a GitHub repository so you can come back to them later.
So the question is, how can we prevent aliasing from happening? One is we can get more samples, okay? We can join the megapixel craze in the current video technology. My birthday's coming up this month and I treated myself to a new camera, and the camera has 36 megapixels in an image, all right, so that I can pull out really fine detail in a, in a, in a portrait. But, in general, this sort of the megapixel thing doesn't go on forever. You know, stuff always can or will go faster and faster as I think, as things get further away, for example. So what do you want to do, well, what you want to do is, you want to make sure your signals are less wiggly. That is, they don't have all that high frequency component. You want to get rid of some of that information. So the idea is, we're going to get rid of some of the high frequency information, but that's going to be better than aliasing, all right? The idea is we don't want to see that weird checkerboard effect, right. So we're going to remove some of the high frequency, but the idea is that the thing will be well behaved. So let's talk about that real quickly in our audio example. What we're going to do is, we're going to introduce lowpass filters.
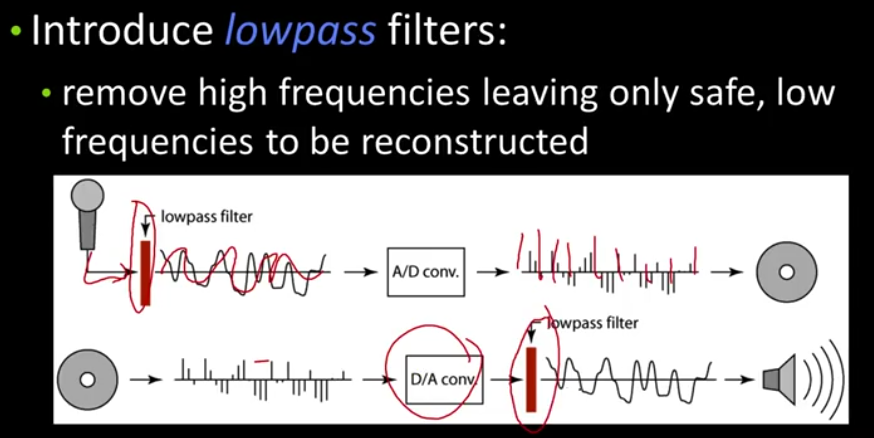
And what the lowpass filter is going to do is, we're going to put that right here. So where the analog voltage is coming out of the microphone, so the signal that goes into the A to D converter, doesn't have frequencies higher than a certain amount. We'll say, okay, great. So that says that we can reduce the number of samples we need to take, or limit the number of samples we need to take, and then when we do the reconstruction, we'll know that anything that was reconstructed that was of a higher frequency than we let in should be thrown away. So we use the lowpass filter again for the output to the speaker.